Why Write rn#
One reason is that I haven't properly written rn myself yet, and I want to try out the experience. Additionally, I've recently become very interested in the Follow RSS reader, but it currently doesn't have a mobile version, making it a good project for me to learn and practice simultaneously. Furthermore, I've recently started working, and I often lack motivation to write the code I want after work; having a goal makes it easier to focus.
Preparation Work#
hello world#
Alright, without further ado, let's get our first app running. However, as the saying goes, "To do a good job, one must first sharpen their tools," so let's prepare the environment first.
Generally, you just need to install Xcode, but if, like me, you recently upgraded to the macOS beta, it can be a bit troublesome:
- The Xcode in the App Store cannot be opened due to a version mismatch with the system.
- The downloaded Xcode beta cannot be opened directly, showing the message
the plug-in or one of its prerequisite plug-ins may be missing or damaged and may need to be reinstalled., and you need to manually install the packages underXcode.app/Contents/Resources/Packages/. See https://forums.developer.apple.com/forums/thread/660860 - You need to select the beta version of Xcode you are using in the command line with
xcode-select -s /Applications/Xcode-beta.app.
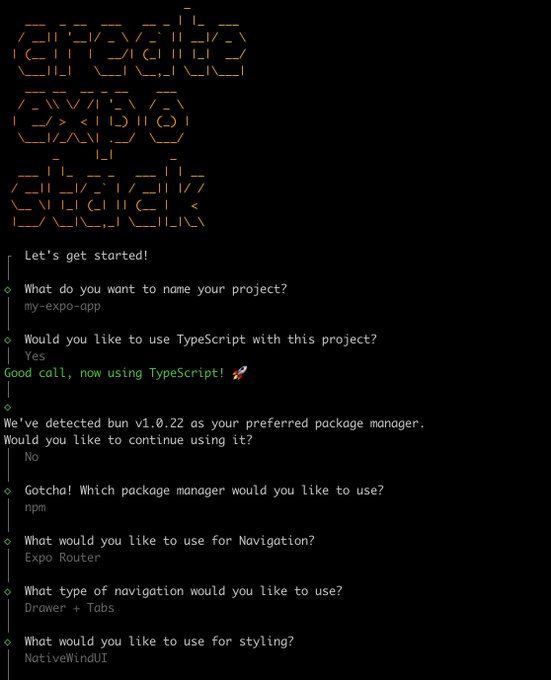
Next, we need a nice scaffold. I'm not very familiar with the rn tech stack, so after looking at State of React Native, I chose the Create Expo Stack that I saw on Twitter.
In addition to serving as a scaffold for an expo project, it also provides many mainstream tech stack combination options, which is very friendly for me to quickly start writing apps. The combination I ultimately chose is:
npx create-expo-stack@latest follow-app --expo-router --tabs --tamagui --pnpm --eas
Handling Dark Mode#
The scaffold defaults to supporting only light mode, which is unacceptable for someone with OCD, so let's address that first. Referring to this issue, I need to modify the expo settings to:
{
  "expo": {
    "userInterfaceStyle": "automatic",
    "ios": {
      "userInterfaceStyle": "automatic"
    },
    "android": {
      "userInterfaceStyle": "automatic"
    }
  }
}
Then your useColorScheme will be able to correctly obtain the user's current theme mode. However, note that after modifying this configuration, you need to run expo prebuild again to ensure that the value of the key UIUserInterfaceStyle in the Info.plist file is Automatic.
The Main Event Begins#
Alright, now let's write the Follow app!
Login Account#
Although the expo documentation has a detailed Authentication integration document, we don't need to use it. The web version of Follow has already handled it, and we just need to call the web login and register the scheme link that will redirect after logging in.
First, set the app's scheme by configuring scheme: 'follow' in the app config, and then run expo prebuild.
Use expo-web-browser to open the Follow login page:
await WebBrowser.openBrowserAsync('https://dev.follow.is/login')
Then use expo-linking to register the URL listening event. Upon receiving the URL information triggered by the login webpage, parse the token inside.
Linking.addEventListener('url', ({ url }) => {
  const { hostname, queryParams } = Linking.parse(url)
  if (hostname === 'auth' && queryParams !== null && typeof queryParams.token === 'string') {
    WebBrowser.dismissBrowser()
    if (Platform.OS !== 'web') {
      SecureStore.setItemAsync(SECURE_AUTH_TOKEN_KEY, queryParams.token)
    }
  }
})
One issue I encountered is that window.open in asynchronous functions on iPhone's Safari is ineffective, and you need to add the target="_top" parameter. Refer to https://stackoverflow.com/q/20696041/15548365
Since the URL will redirect to the auth page, we can add a route to redirect it to the homepage app/auth.tsx.
import { router } from 'expo-router'

export default function Auth() {
  router.navigate('/')
  return null
}
OK, now we can obtain the user's authentication credentials. Let's try calling an API to see.
Get User Information#
Making network requests in rn looks no different from web; we can still use our favorite libraries.
function useSession() {
  return useSWR(URL_TO_FOLLOW_SERVER, async (url) => {
    const authToken = await SecureStore.getItemAsync(SECURE_AUTH_TOKEN_KEY)
    const response = await fetch(url, {
      headers: {
        cookie: `authjs.session-token=${authToken}`,
      },
      credentials: 'omit',
    })
    const data = (await response.json()) as Session
    return data
  })
}
Here, I made a somewhat unusual setting temporarily because there are some known issues with cookie-based authentication in rn. If you don't set credentials: 'omit', it will set incorrect cookies on the second request, causing the request to fail. This approach is based on https://github.com/facebook/react-native/issues/23185#issuecomment-1148130842.
With the data, we can render the page. Let's write a simple version:
export default function UserInfo() {
  const { data: session, mutate } = useSession()

  return (
    <YStack flex={1} padding={20}>
      {session ? (
        <YStack>
          <XStack gap={24} alignItems="center">
            <Image
              source={{
                uri: session.user.image,
                height: 100,
                width: 100,
              }}
              borderRadius={50}
            />
            <YStack gap={8}>
              <Text color="$color12" fontSize="$8" fontWeight="600">
                {session.user.name}
              </Text>
              <Text color="$color12" fontSize="$5">
                {session.user.email}
              </Text>
            </YStack>
          </XStack>
        </YStack>
      ) : (
        <Button onPress={handlePressButtonAsync}>Login</Button>
      )}
    </YStack>
  )
}
Alright, let's see how it looks now.
Uh-oh, it seems that the web version of Follow still needs some mobile adaptation; I can submit a PR for that.
Theming System#
When initializing the project, I chose Tamagui, but when I started customizing the theming system, the documentation made my head spin 😵💫. Coupled with its all-encompassing style, I switched to Unistyles.
Its theming system is just a regular object; I only need to pass my favorite Radix Color to it. Unlike Tailwind's color scheme, it designs corresponding dark colors for each color, making supporting dark themes very simple.
export const lightTheme = {
  colors: {
    ...accent,
    ...accentA,
  },
} as const

export const darkTheme = {
  colors: {
    ...accentDark,
    ...accentDarkA,
  },
} as const
Since there are quite a few colors to pass, it's easy to forget to add the corresponding theme to the dark theme as well, so we can use type checking to enforce this. Refer to How to test your types.
type Expect<T extends true> = T
type Equal<X, Y> = (<T>() => T extends X ? 1 : 2) extends <T>() => T extends Y ? 1 : 2 ? true : false
type _ExpectLightAndDarkThemesHaveSameKeys = Expect<Equal<
  keyof typeof lightTheme.colors,
  keyof typeof darkTheme.colors
>>
Additionally, you can easily modify the theme using its runtime, so writing dynamic theme switching like the following becomes very simple.
UnistylesRuntime.updateTheme(
  UnistylesRuntime.themeName,
  oldTheme => ({
    ...oldTheme,
    colors: {
      ...oldTheme.colors,
      ...accent,
      ...accentA,
      ...accentDark,
      ...accentDarkA,
    },
  }),
)
Local First#
If it were a web application, it would be understandable not to implement Local First. However, as an app that can run SQLite, there’s no reason it shouldn’t be able to open in an offline environment. Currently, my idea is that the app primarily interacts with the local database, using network requests for data synchronization.
Regarding the choice of tech stack, I unhesitatingly chose drizzle for the following reasons:
- The Follow server is currently using it, and I can even copy many table definitions.
- Compared to libraries like Prisma that use code generation for types, I prefer to write table definitions in ts, allowing types to refresh in real-time.
- The integration recommended by the Expo official documentation is drizzle, while Prisma's integration is still in Early Access.
Expo SQLite provides the addDatabaseChangeListener interface, allowing us to receive the latest data in the database in real-time, and drizzle provides the useLiveQuery wrapper. However, currently, its hook does not correctly handle the dependency array of useEffect:
Additionally, we need to cache the results; otherwise, there will be many unnecessary database queries when switching pages. Therefore, we will wrap a hook using swr ourselves.
import { is, SQL, Subquery } from 'drizzle-orm'
import type { AnySQLiteSelect } from 'drizzle-orm/sqlite-core'
import { getTableConfig, getViewConfig, SQLiteTable, SQLiteView } from 'drizzle-orm/sqlite-core'
import { SQLiteRelationalQuery } from 'drizzle-orm/sqlite-core/query-builders/query'
import { addDatabaseChangeListener } from 'expo-sqlite/next'
import type { Key } from 'swr'
import type { SWRSubscriptionOptions } from 'swr/subscription'
import useSWRSubscription from 'swr/subscription'

export function useQuerySubscription<
  T extends
  | Pick<AnySQLiteSelect, '_' | 'then'>
  | SQLiteRelationalQuery<'sync', unknown>,
  SWRSubKey extends Key,
>(
  query: T,
  key: SWRSubKey,
) {
  function subscribe(_key: SWRSubKey, { next }: SWRSubscriptionOptions<Awaited<T>, any>) {
    const entity = is(query, SQLiteRelationalQuery)
    // @ts-expect-error
      ? query.table
      // @ts-expect-error
      : (query as AnySQLiteSelect).config.table

    if (is(entity, Subquery) || is(entity, SQL)) {
      next(new Error('Selecting from subqueries and SQL are not supported in useQuerySubscription'))
      return
    }

    query.then((data) => { next(undefined, data) })
      .catch((error) => { next(error) })

    let listener: ReturnType<typeof addDatabaseChangeListener> | undefined

    if (is(entity, SQLiteTable) || is(entity, SQLiteView)) {
      const config = is(entity, SQLiteTable) ? getTableConfig(entity) : getViewConfig(entity)

      let queryTimeout: NodeJS.Timeout | undefined
      listener = addDatabaseChangeListener(({ tableName }) => {
        if (config.name === tableName) {
          if (queryTimeout) {
            clearTimeout(queryTimeout)
          }
          queryTimeout = setTimeout(() => {
            query.then((data) => { next(undefined, data) })
              .catch((error) => { next(error) })
          }, 0)
        }
      })
    }

    return () => {
      listener?.remove()
    }
  }

  return useSWRSubscription<Awaited<T>, any, SWRSubKey>(
    key,
    subscribe as any,
  )
}
Note the queryTimeout here!!! Since table changes can be very frequent, we need to cancel previous queries; otherwise, it will affect query efficiency. Drizzle also does not support using AbortSignal to cancel queries, so we handle it with setTimeout.
https://github.com/drizzle-team/drizzle-orm/issues/1602
OK, as long as we set the key correctly when requesting data, we can efficiently obtain the latest data. With pull-to-refresh and timed data synchronization, our app can achieve basic Local First functionality.
Finally, let's take a look at how it looks now!
Share Your iOS App#
This note records the pitfalls I encountered while distributing the app for others to test, hoping to help you avoid them, provided you have an Apple Developer account.
Refer to Expo's Share pre-release versions of your app article, you have the following three ways to share a preview version of your app.
- Internal distribution
- TestFlight internal testing
- TestFlight external testing
Internal Distribution#
- For internal distribution, each testing device requires a temporary provisioning profile, and this method can only distribute to a maximum of 100 iPhones per year.
- The temporary provisioning profile requires obtaining the device's UDID. You either need to have the user obtain it themselves via Mac Xcode or get it through installing a provisioning profile (you need to establish trust between you and the tester).
- Each time you register a testing device with Apple, you need to wait for Apple to process it, which can take up to a day.
- After registering a new device, you need to rebuild the app.
- Applications distributed this way require users to enable developer mode on their phones.
In summary, this method is only suitable for very small-scale internal testing.
TestFlight Internal Testing#
TestFlight internal testing requires you to assign your Apple Developer account permissions to testers, and it does not require submitting your app for review. Therefore, it is also only suitable for small-scale internal testing.
TestFlight External Testing#
TestFlight external testing can distribute your app to users in various ways, such as adding via email or link, which is also the most common external testing method.
Its requirement is that you need to submit the app for review, and during submission, you need to provide accounts for testers, but in reality, you can ignore this information. From my submission experience, the first submission takes about a day, but it will not be rejected. Subsequent reviews are instant automated reviews, which is very convenient.
By the way, when filling in contact information, the phone number error message is incorrect; you just need to add +86.
Summary#
When you want to share your app with others, I recommend trying TestFlight external testing for distribution first, even if you are not ready for review. If the first review passes directly, then it’s all good.
Using expo and eas to build and submit the app is very convenient; you just need to:
npx eas build --profile production --local
npx eas submit -p ios
Of course, don't forget to update your eas configuration:
{
  "cli": {
    "appVersionSource": "remote"
  },
  "build": {
    "development": {
      "developmentClient": true,
      "distribution": "internal"
    },
    "preview": {
      "distribution": "internal"
    },
    "production": {
      "autoIncrement": true
    }
  },
  "submit": {
    "production": {
      "ios": {
        "ascAppId": "123456"
      }
    }
  }
}

